
How To: Create a quest tracking system
- 4. Sept. 2016
- 4 Min. Lesezeit
Today's tutorial will walk you through the process of creating a quest tracking system. It requires a deep understand of Linking & Triggering, so make sure you keep up and ask questions, if you don't understand something!

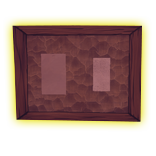
Let me start by explaining the tracking system. There is an item on your build site that, when clicked on, will tell the player the current status of a quest. That item can be anything, you would like it to be. Personally, inspired by Maqea, I chose to use a painting that is sunken into the wall so that only its frame is visible. I then painted the inside with a different material and thereby created a bulletin board. This tutorial, however, will use a the bulletin board.
Since the final setup is dependent on how you design your quest, I will determine a quest setup first and present the corresponding solution to that particular setup:
This is a 3 stepped quest. The player talks to the quest NPC and thereby triggers the quest (quest step 1). The quest requires the player to talk to another NPC. When the player talks to the other NPC, that NPC asks the player to kill a monster (quest step 2). When the player kills the monster, the quest updates one last time and is finished (quest step 3). During this entire process, the player can click on the bulletin board to check the current quest step.
This particular setup requires the following items:

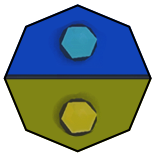

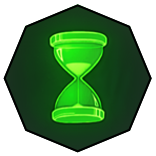
Every quest step requires 3 props: a Story Node to display the text, a Logic Filter to determine which step is currently active and a Timer Filter to reset the Logic Filter so that the player can click on the bulletin board multiple times and not just once. Make sure that you set up the Story Node, implement the text for each quest step, display text on Screen and set the Timer Filter to 2 seconds.
Links 1-3 (Logic Filter 1) When both lights turn on, activate the text on this node. (Story Node 1) (Logic Filter 1) When the blue lights turns on, start this timer. (Timer Filter 1)
(Timer Filter 1) When this timer completes, turn off the blue light. (Logic Filter 1)
Now repeat that with 2 more sets for quest step 2 and 3. If your quest contains more or less steps, then repeat the previous step accordingly:
Links 4-6 (Logic Filter 2) When both lights turn on, activate the text on this node. (Story Node 2) (Logic Filter 2) When the blue lights turns on, start this timer. (Timer Filter 2)
(Timer Filter 2) When this timer completes, turn off the blue light. (Logic Filter 2)
Links 7-9 (Logic Filter 3) When both lights turn on, activate the text on this node. (Story Node 3) (Logic Filter 3) When the blue lights turns on, start this timer. (Timer Filter 3)
(Timer Filter 3) When this timer completes, turn off the blue light. (Logic Filter 3)
Now we connect the bulletin board (or whatever item it is you wish to use as such) to the Logic Filters. Note that you can have an infinite number of bulletin boards to trigger this display. Simply set them all up to trigger the blue light of every single Logic Filter when a player clicks on them. In this case that's 3 Logic Filters, yours might have more or less:
Links 10-12 (Prop) When a Luminary clicks this object, turn on the blue light. (Logic Filter 1)
(Prop) When a Luminary clicks this object, turn on the blue light. (Logic Filter 2)
(Prop) When a Luminary clicks this object, turn on the blue light. (Logic Filter 3)
Every additional copy of that prop would require to be connected exactly the same way.
Next, we connect the quest triggers to the appropriate step. The first interaction the player will have to do in order to start the quest is talk to NPC #1. The system determines the quest step to currently display by the yellow light of the Logic Filters. Only one yellow light will be on at a time, allowing only that particular Logic Filter to light both lights when the player clicks on the bulletin board. In order to make sure that there are never two lights on at the same time, we connect each quest step to turn on its yellow light and turn off all the others. Additionally, the NPC will trigger the Story Node of the first quest step to inform the player right away of how the quest has updated.
Links 13-16 (NPC 1) When a Luminary clicks this creature, turn on the yellow light. (Logic Filter 1)
(NPC 1) When a Luminary clicks this creature, turn off the yellow light. (Logic Filter 2)
(NPC 1) When a Luminary clicks this creature, turn off the yellow light. (Logic Filter 3)
(NPC 1) When a Luminary clicks this creature, activate the text on this node. (Story Node 1)
We basically do the same with every quest step trigger and the corresponding quest step.
Links 17-20 (NPC 2) When a Luminary clicks this creature, turn off the yellow light. (Logic Filter 1)
(NPC 2) When a Luminary clicks this creature, turn on the yellow light. (Logic Filter 2)
(NPC 2) When a Luminary clicks this creature, turn off the yellow light. (Logic Filter 3)
(NPC 2) When a Luminary clicks this creature, activate the text on this node. (Story Node 2)
Links 21-24 (NPC 2) When this creature dies, turn off the yellow light. (Logic Filter 1)
(NPC 2) When this creature dies, turn off the yellow light. (Logic Filter 2)
(NPC 2) When this creature dies, turn on the yellow light. (Logic Filter 3)
(NPC 2) When this creature dies, activate the text on this node. (Story Node 3)

Kommentare